
For quite some time I have been thinking about doing a furniture painting tutorial. I have had many many requests for it and to tell the truth I really felt like maybe I am not worthy--I am not a professional afterall. But after many years of painting everything but the kitchen sink (and that may be coming:)) I decided to share how I do it.

This is my most recent project that I am going to use to show you what I did.

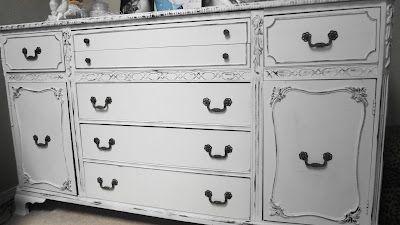
It began looking like this. I got it at Goodwill for 19.99--I fell in love with it because of all the detail. I knew I could make it pretty!

I don't always sand-but this piece had some shiny spots and so I did some light sanding--just enough to knock off the shiny spots.

Another thing I don't always do is prime. On this piece I did because I didn't want anything bleeding thru. I like to use Kilz spray paint. I like to spray especially on a piece like this, because there is so many little cracks and crevices.

This piece was missing the 2 drawer pulls it originally had. I am a big fan of glass/crystal knobs so I decided to put one in the middle rather than looking for drawer pulls to match. So I filled all the holes with wood filler. I got this at Walamrt for just a few dollars and it is very easy to use. There was a couple other bad spots that I also fixed.

After it dried I sanded it a little and no more holes!

Next I mixed up my home made chalk paint. I use an interior flat paint. I use Plaster of Paris mixed with water to add to the paint to make the chalk paint. I usually just wing it but I tried to pay attention to the mix to let everyone know the recipe. I used about 1.5 cups of paint, mixed 5 T. of Plaster of Paris to about 7 T. of water (mixed that together) and stirred that into the paint. I just whip it up with a fork. Chalk paint tends to get thicker as it sits out and I just add a little more water when needed. I love the texture of the chalk paint and the way it adheres.

I usually mix it up in a canning jar. I saw someone who had their own booth sold little jars of their own homemade chalk paint. It would be a great gift to make for a friend.

Then I just use my Purdy brush and start painting. I thought this piece would look great with some teal-grey so I added that to the inside and places in the front. I got my handy husband to put a hole in the middle of the drawer for my knob.

I had to lock the cats in my daughters room as they wanted to help.:)

I guess let them out to soon because look what I found on the inside of the cabinet the next morning. (above) I'm sentimental---I think it just adds to the memories. :)

To do the distressing I have tried many things..sanding etc. My favorite thing is to use Rub N Buff. I just go over it with my finger and accent all the pretty details. I think it brings the piece alive. My favorite color of Rub N Buff is Spanish copper. You can buy this at some art stores, or Ebay.

My finger is my favorite tool for this technique!

I often paint my hardware on a project.You can paint in place if you want but I always remove it and paint it and distress it before putting it back on.

After everything is totally dry I wax it to seal it with a paste wax. There are many available. You just rub it on with a lint free cloth.

I really love the new look of my new TV cabinet!

So that is how I transform old Goodwill furniture into shabby chic furniture that I love. Feel free to ask if you have any questions and I hope that this post will inspire some of you to have fun remaking furniture.
I will end this post with a few of my other favorite remade pieces.


Thanks so much for visiting!
79 comments:
They are all so pretty but I especially love the hutch. I would play with that everyday. I think it is quite charming that you have left the paw print as a memory. So sweet.
Great tutorial, Sandy. Looks pretty professional to me. Love the finish, and the price on that Goodwill find.
Hi Sandy ~ that was a super good tutorial. Thanks for sharing. I love that Kilz stuff too...it's awesome! I just LOVE your cabinet!
It is absolutely gorgeous! I have to find some wax that doesn't have such a potent smell like the minwax I have. It about kills me when I use it. I am also going to try the plaster of paris recipe too since you like it so well. I mix mine in little jars and have thought about selling them. But when I mixed mine with the unsanded grout, it got too thick and then I thought that wouldn't work to well. So, you have revived my hope, lol. I love your pieces so much, they are all absolutely beautiful!
Hi Sandy,
I love your beautiful painted pieces and I think that you should "toot" your horn more often!
You do a lovely job and it's great that you are willing to share your techniques. I've never used Rubn Buff but I'm going to try it now.
I also am going to try your chalk paint recipe.
hugs
Sissie
Sandy, this is a great tutorial! Thank you for showing each step! I love the idea of homemade chalk paint. I have used Calcium Carbonate to make mine and want to try your recipe! I love the idea of rub and buff to distress. Your piece is lovely, as are the others!
Enjoyed your tutorial so much. The idea of rub and buff sounds wonderful ... Your pieces look wonderful.. Hugs, Cindy
Thank you for sharing your tutorial. Your pieces turned out beautifully! Vanna
I love your white and turquoise combination. Very thorough tutorial, thank you. I love the cat print!
Beautiful piece, great job, I too make my own chalk paint and wing it! I have never tried rub and buff, but I am going to use it on an up coming project, thank you for sharing!
Carol
This is such a great tutorial. Thanks for sharing it. Pretty piece,too!
Sandy - your painting is certainly very professional and beautiful! Thanks for sharing the tutorial - I was wondering about alternate ways to distress - I am going to try the rub & buff - I love the look you are getting. The piece really turned out lovely!
Peggy
This is a great tutorial especially since I needed one JUST like this because I just began today taking apart my bedroom for my "Ethereal Bedroom" makeover, and I'm painting furniture and everything else shades of white with touches of pearl and silver. What is the brand of wax you used? I especially LOVE the paw print! amazing how cats investigate everything LOL The t.v. itself could use the same touch *wink* But ALL of your pieces are gorgeous and you should feel proud.
:D
Sandy,you make me want to try everything you do,you are so creative. Your TV cabinet is so nice.xx
Oh Sandy what a fabulous tutorial!
I love how that piece turned out and i love rub 'n' buff but have never used 'Spanish copper' after seeing your work i am going to get some and give it a try x
love the tut...question I have made home made chalk paint...and I use ASCP a lot...but I want to make more home made...does it always need to be a flat paint to work with
Hi Sandy. I'm so happy I saw your post this time. Your cabinet came out beautifully and thanks for the tutorial. I tried mixing some chalk paint with plaster of paris but I had a recipe of 2 parts paint to 1 part plaster of paris. Even with water I couldn't get it thin enough and gave up and just painted with the paint. I'm going to try you recipe again before I go and spend $40 for AS paint..Happy Friday..Judy
So great makeover ! I'm amazed to see how an old piece looking bad can become a wonderful cupboard ! Bravo
xoxo from PARIS
Joëlle
Love that pawprint!!! Wouldn't change that either, you will smile everytime you see it! The new TV cabinet is just lovely!! Enjoyed the tutorial too!! Have never used Rub N Buff, but this is something that I have to try!
just gorgeous, sandy! tfs your paint formula:) love the beautiful furniture pieces, too!
You are an excellent teacher...I almost think I could do it following your directions. :-) The chest turned out beautifully.
So pretty!
Sandy,
That piece turned out really beautiful!! I am going to try and make my own chalk paint as soon as my Annie Sloan paint is gone...
Blessings,
Amy Jo
You do beautiful work! Thanks for the tip about the rub n buff, never would have thought of that :)
Thank you, Sandy, for the tutorial and the paint recipe. Such a good price for that lovely piece of furniture. That paw print is so cute! I think it's so sweet of you to leave it there.
This is such a pretty piece with all the detail! Thanks for the tutorial on how you use rub n' buff. I have some, but haven't used it much. I will have to try this.
{{hugs}}
Deborah
You have done some amazing pieces, I do alot of painting and still picked up some wonderful pointers. Thanks for sharing!
Hi Sandi,
thank you for the great tutorial.
I like your way of distressing and the effect is amazing.
I love all your painted pieces. simply stunning.
rita
Hi, I love your wonderful find especially the price, can't beat that. I thought your way of distressing was unique. I've never seen it done that way without sanding to distress. Great job.
Peggy @ southscapedesigns.com
You do amazing work. I love the cabinet, and thanks for the info. I am getting ready to do chalkpaint on a table, and needed the info on amounts. The hankies are beautiful. I love them. I have a link party on Wednesdays, and I would love it if you would link this and any other posts. It is called Wednesdays Adorned From Above Link Party. It runs from Wednesday to Sundays.
http://www.adornedfromabove.com/2012/10/almond-sugar-body-scrub-and-wednesdays.html
I hope to see you there. I am your newest follower, and I would love for your to follow me also. Have a great Day.
Debi Bolocofsky
Adorned From Above
www.adornedfromabove.com
i LOVE this piece. You did a great job.
Candy
PICKINandPAINTIN.blogspot.com
What an excellent tutorial---thanks so much for sharing! Your transformations are just beautiful & I'm anxious to try distressing with Rub n' Buff! I think it's just PURR-FECT you left the sweet paw print...all pieces need a 'signature' & I cannot think of a better one that a paw print! I'm owned by three sweet kitties! <3 Blessings! (your newest follower!)
Wow! Your pieces are just beautiful! I especially love the blue on the white. So nice!!
Thank you for sharing. So far what's kept me from painting any furniture (besides the relentless heat and humidity here) is my cats. How does the paint hold up with the cats? Do they jump up on your pieces? Are scratches easy to fix? If it ever cools off I'd like to give painting a try.
You have some beautiful pieces!!! What a great tutorial...your technique is a little different than mine and it was really fun to read something new. I'm excited to give the rub & buff a try! Hopped over from Furniture Feature Friday and I'm happy to be your newest follower. Would love to have you stop by for a visit. Blessings ~ Judy
Beautiful job and beautiful piece too!
I also love the other pieces! Congrats and thanks for share them!
OMGOSH Sandy, your furniture pieces are absolutely gorgeous.... I cannot believe you got the cabinet for 19.99 what a steal. I want one... I also want that little shelf like thingy with the glass door... I've been looking for something like that for a very long time and haven't found anything yet for my bathroom. NOw I'm really in a mess because I want one just like that... it is so adorable. Did you add the details to it?
You did a fabulous job on all your pieces I LOVE them all.
Thanks for sharing~
Hi lovely lady.
Thanks so much for your sweet comments on my Tablescape for Autumn. Your Goodwill find are now Gorgeous you did a beautiful job on all of them.. YOU ARE GOOD. I hope you have a wonderful weekend with your family.
XXOO Diane
It turned out beyond gorgeous!!! Loving that pop of turquoise color ( I even loved you kitty's signature lol )
XOX
Thank you so much for posting this! I will be trying your paint recipe and techniques soon. Your pieces all look amazing.
Your cabinet find turned out beautiful. Thanks for sharing the tutorial! Love all your inspiration! xo's Pam
Sandy - What a good tutorial for painting furniture!! Thanks for the recipe for the chalk paint. Am going to try it soon.
Judy
Beautiful job Sandy,
Many years ago I too created my own chalk paints and now it's all the big trend and costly. Is it not so much fun and so exciting to see the beauty that can be created from a cast off, a perfect find at a local thrift when no one else wants that piece turned from out dated to euro-chic !
Sandy thank you for sharing your time visiting and encouraging my art :)
See you soon and all the beauty you create and inspire.
Xx
Dore
Beautiful job Sandy, your 19.99 treasure now looks like a million bucks. Thanks for the great tutorial.
LOVE your post!! You so amaze me with what you do with a can of paint. And you inspire me. I now have two projects sitting in the garage begging me to make them beautiful again. They are thrilled that I'm reading your post!!! :) N.
What a beautiful technique you use on furniture!! I love everything about your style. Just gorgeous!
You've done some great pieces, Sandy! I love this newest one with the second color. I haven't tried the copper rub n buff yet, but will have to find something I can use it on.
Beeeeautiful job, Sandy! Wow! And great tutorial! I never thought of priming a piece with spray paint, so I learned a new tip today. :) Annnnd.....I must tell you, that I finally made my own dream catcher this weekend after reading your wonderful tutorial on yours! Thank you!!!! I ADORE making them and now have two hanging in my home. I want to make a buuuunnch more for my booth and to give to all my friends. I'm officially hooked!!! :)
xoxo laurie
Thank you so much for the great tutorial, I can't find chalk-paint here and now you have given me a push to make my own and paint some of my furniture.
The measurements are tea spoons or table spoons?
I love all your finished pieces.
Hugs,
Angela.
Well...you say you are not a professional, but I don't agree! I would pay you to come paint my stuff any day!!
BEAUTIFUL!!
Have a great week my friend,
Dana
Love all your pieces- they look stunning-I'm your newest follower-stop on by for a visit! Claire
All of your pieces are absolutely gorgeous! You may say that you are not a professional but.......I don't believe it, your work is definitely professional looking. Love the little kitty print too!
~Lynn
Hi Sandy,
Ha, not professional, It looks completely professional to me! You do gorgeous work, and a very nice tutorial too! I love the small glass fronted cabinet:-) I also love how the kitty signed your work, we have one of those on our patio (in cement:-).
Hugs,
Bella
Simply Smashing my darling! It turned out beautiful and your other pieces are just as grand~Cheers Kim xox
You are very artist!!!
saludos desde Chile
Eeeek... I love it!!! Fabulous!
I just can't get over how cute the paw print is I love it!!!
Sandy, love your pieces, thank you so much for your sweet comments, I'm just getting used to this blogging thing
Katie
Dear Sandy, thank you for visiting me today and for your sweet comment. I am so happy to be back on line...too many computer problems to mention! I must also say thank you for this amazing tutorial...who knew I could make my own chalk paint!! You are the sweetest and I love how that cabinet turned out!
Take care and have a lovely day!
xoxo
Debbie
Wow...great "toot!" My favorite is the cat stamp. Reminds me of my husband's note written inside my washstand drawer, the one in my "chicken wire memo board" post. The dresser is lovely, now...gotta love the "angel wings"on the doors!
I'm so-o-o glad that you stopped by to comment on my latest.
Hugs,
JP
Sandy this tutorial is AWESOME!!!! I do a lot of painting too, but I always learn so many new things when I see how others do theirs.
Your console cabinet turned out so beautiful!!!!!
sending hugs...
Hi Sandy!
I am So glad you visited me and left that sweet comment or else I might have forgotten to come back and read the rest of this tutorial. I am ALWAYS getting distracted! I wanted to copy down that chalk paint recipe and finish reading about how you antiqued it. Does rub n buff have precautions about skin contact? I ask that because years ago we were told not to have skin contact with a gold powder used for decorative painting. As you can tell I have never used rub n buff before, but I will be trying it out soon :)
The other day I thought this was a chest of some kind but now I see that it is a BIG nightstand? I still can't believe you got it for 20 bucks! My GW thinks it is a designer boutique.
It looks lovely all glammed up and I love the accent color.
xoxo Bunny Jean
Oh... I love that paw print and knew right away that it would be staying :)
Wowsers Sandy, i didnt realize u were such a good painter. I love the way all of ur pieces turned out. Ive been looking for a good simple chalk paint recipe (that isnt $40 a quart, LOL) to do my buffet in. Only one small question, Does the plaster of paris start to "stiffen" limiting ur working time?? Im sorry it takes me so long to get over to see u...so glad i did..............Bonnie
Thanks for your post on painting furniture, I am wanting to do my guest bedroom bed in white like this, it is now a mint green. I found your blog on At Nann's Table. Like you I love white. Your post has helped me to know how to redo my guestroom furniture.
Sandy all your furniture pieces are beautiful.. I loved that you added the tutorial and where you get the supplies.. Hugs to you..
Thank you for posting! I have a very small piece of furniture I have been putting off refinishing, but you have given me the confidence to try. It was a GW find too for ~10$ so really what's the harm in trying?! I do have one question and I apologize if you have already answered it, as I did not read all 66 comments.
What about the crevices? Do you have to get in there to sand those or will the paint stick even if you don't?
They are all so pretty,It looks lovely all glammed up and I love the accent color.
Hospitality furniture
Your pieces are just beautiful! I enjoyed reading your post. Thank you for sharing.
Leticia
Hi this one is great and is really a good post. I think it will help me a lot in the related stuff and is very much useful for me. I like your furniture style and choice of color. Very well written I appreciate & must say good jobfurniture shops
http://elizabethandco.blogspot.com/2012/08/painting-my-sad-bedroom-furnture-done.html
I would like to appreciate you for the wonderful project you completed recently by painting the TV cabinet, it’s looking great in white and sea green.
painting reston va
That is great tutorial... Thanks for sharing and the furniture is looking gorgeous after the color... Great job.Bedroom Furniture Online
You do beautiful work! Thanks for the tip about the rub n buff, never would have thought of that.online beds company
I got this blog site through my friends and when I searched this really there were informative articles at the place.Aspire Atlantis
So i am in fact content with see our site not to mention could have fun with perusing effective content pieces circulated in this case. Typically the creative ideas of this contributor was basically fantastic, thanks a lot for ones show.
Furniture UK
برای شستشوی فرش ها و جلوگیری از صدماتی که ممکن است در اثر شستشوی غیر اصولی به آنها وارد شود ، رعایت نکات خاصی ضروری است. نکاتی که باعث می شود فرش های دستباف در اصفهان زود زرد نشوند یا حتی پوسیده نشوند. شستشوی فرش دستباف در اصفهان تخصص کارخانه همیشه تمیز است.
Post a Comment