Thursday, October 25, 2012

My First Giveaway

I am finally ready for my first giveaway! I feel like my life is so enriched by all my blogging friends I want to give back, in a small way, by giving away 2 of my recent projects.


I did tutorials on both of these projects and these two things are what I am giving away.


In all beautiful tones of white and cream you can find the tutorial for the dreamcatcher here

I found some feathers to add to it too. I think it is so pretty!


The white lacy angel wings have feathers and a rhinestone cross. So pretty. You can find the tutorial here.


I made these both all in white so they would look pretty in anyone's romantic home!

So here is how you can win them...

1.  Leave a comment that you would like to win this giveaway
(that's easy) :)

2.  Leave a comment that you are already a follower, or that you are a new follower to my blog

3.  Share this giveaway on Facebook

4. Share this giveaway on your blog

I think that's pretty easy! I am very excited to give this away to one of you. The winner will be randomly drawn on November 8th.


I hope you like this giveaway! 

Thanks for visiting!

Wednesday, October 24, 2012

I'm so excited!

As most of you know Janae has been very involved with making great entries for the online Petsmart costume contest. We found out today that Bunny Fufu made it to the top 25! This is huge considering there was 12,735 entries! So from now until halloween I need to ask a favor of anyone willing to help--please vote for Bunny Fufu because Janae has a 1-25 chance of winning $10,000!


I know I am her Mom, but I swear Janae is one of the best pet Mom's around. She really loves her babies and takes perfect care of them. She deserves to be a winner in this contest! Any human child would be lucky to be as loved as Janae's pets are. I am so proud of her.

To vote you have to have a Facebook and you have to like Petsmart. It really only takes a minute. You can vote everyday and we would appreciate you voting as often as you can. Thanks in advance for voting and thanks so much!

This link will take you to Bunny Fufu's entry here

Wouldn't it be awesome if Janae won the Grand prize?! Not only because of the $10,000 but because of the thrill of the win!

I will soon be back to my regularly scheduled projects... :)

Thanks for visiting!

Saturday, October 20, 2012

Fun with Pets

As many of you know my daughter, Janae, has been very into her pet photography and dressing her pets for Halloween. She has done some amazing portraits for the contest! On my sidebar there is a link to her blog if you want to check it out. Anyway--today we went to the instore Petsmart pet contest. I was so proud of both of my daughters and how they dressed their pets, and themselves!


Here they are at Petsmart. This is Bunny biker Fufu with biker Mama Janae and Pirate Walter the hamster with Mama Pirate Chantel.


They had to sit calmly for over a half hour when people went on and on about how cute they were and took pictures. People were especially impressed with Fufu--because most people have not seen a bunny so well trained. There was only once that it seemed Fufu and Walter planned it and they both tried to escape at the same time. :)
 
 
Chantel and Walter led the pet parade around the store.


They had their pictures taken by many.


The lighting in Petsmart was horrible so I am not going to win any photography awards but you can see the fun they had.


Janae and Fufu won first and Chantel and Walter won third. The prizes aren't big for the in store contest --they got some cute toys and Fufu got a $10 gift certificate and Walter got a $5 gift certificate. Walter was especially thrilled with his toy. He chewed on it all the way home. Now we have our fingers crossed they do well in the online contest--top prize there is $10,000.00!

So I will end this post with a photo of the boys taken during spirit week. It can't be all about the girls:) This is the boys on Super Hero day--I made their capes. What cute kids I have!


Thanks for visiting!

Thursday, October 18, 2012

Angel Wings Tutorial

I have an obsession with angel wings. They are calming to me. They are clean and pure, a symbol of all heavenly.

I made some for Janae for her birthday, and I am pretty sure she loved them...I know I did! So I thought with the next one I made I would do a tutorial. I have not seen any other tutorials online on how to make them so I just had to "wing" it...LOL!


First of all I got some wire that was in the jewelry section of our local craft store. I forget what the gauge was but I got a pretty large wire. I tried with a thinner wire and just felt I didn't have very good control.


So I took a piece of wire that looked like the above photo (and cost about $1.99) and bent it into the wing shape I like. This type of wire bends very easily.


This part always frustrates me because I am such a perfectionist. It is hard to shape it perfectly. You can look online and find all sorts of pretty angel wings shapes. I like this shape because I think it looks feminine. I like girly angel wings:)

After forming the wings I cut a piece of lace to fit one side of the wings. I don't cut it exactly just a piece big enough to cover one side.


Then I sew the piece of lace onto the wire. This part is time consuming. (and my hands kill me during this part because I have arthritis) Make sure the stitches are pretty close together and gently pull the lace tight as you go around the wing.


Then do the same to the other side.


The above photo is the stitches shown from the backside.

After you are done stitching carefully cut close to the edge of your stitching all the way around on both wings.


Use a hot glue gun from the back side apply glue and adhere a pretty lace trim. To me, these wings are all about the lace!

Cut a piece of white fabric and fold it around the middle part...glue down.


Then I added a little "pouf" of feathers and a gorgeous rhinestone cross I got on sale at Michael's. They have so many pretty things!


Then my lovely angel wings are done. I think they are so pretty.


This time of year it is so hard to get good photos with it getting dark so early and all the shadows. I walked around the house and let the wings land a couple places for a photo. :)


To all of you that commented on my last post, thank you so much! I was really happy to have over 60 comments (an all time high for me!) lots of pins and new followers! Everybody loves a pat on the back and I really felt happy about the response of my last post. As a thank you for all of you being so encouraging to me, this set of angel wings is going to be given away on my blog, along with the dreamcatcher I recently made. So if you don't think you are wanting to make your own you can have a chance at winning this one. Stay tuned!


 Won't these make just beautiful Christmas decorations?! 

Thanks for visiting!

Thursday, October 11, 2012

Painting Furniture Tutorial

For quite some time I have been thinking about doing a furniture painting tutorial. I have had many many requests for it and to tell the truth I really felt like maybe I am not worthy--I am not a professional afterall. But after many years of painting everything but the kitchen sink (and that may be coming:)) I decided to share how I do it.


This is my most recent project that I am going to use to show you what I did.


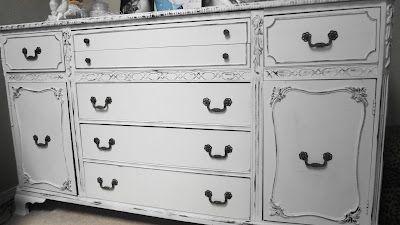
It began looking like this. I got it at Goodwill for 19.99--I fell in love with it because of all the detail. I knew I could make it pretty!


I don't always sand-but this piece had some shiny spots and so I did some light sanding--just enough to knock off the shiny spots.


Another thing I don't always do is prime. On this piece I did because I didn't want anything bleeding thru. I like to use Kilz spray paint. I like to spray especially on a piece like this, because there is so many little cracks and crevices.


This piece was missing the 2 drawer pulls it originally had. I am a big fan of glass/crystal knobs so I decided to put one in the middle rather than looking for drawer pulls to match. So I filled all the holes with wood filler. I got this at Walamrt for just a few dollars and it is very easy to use. There was a couple other bad spots that I also fixed.


After it dried I sanded it a little and no more holes!


Next I mixed up my home made chalk paint. I use an interior flat paint. I use Plaster of Paris mixed with water to add to the paint to make the chalk paint. I usually just wing it but I tried to pay attention to the mix to let everyone know the recipe. I used about 1.5 cups of paint, mixed 5 T. of Plaster of Paris to about 7 T. of water (mixed that together) and stirred that into the paint. I just whip it up with a fork. Chalk paint tends to get thicker as it sits out and I just add a little more water when needed. I love the texture of the chalk paint and the way it adheres.


I usually mix it up in a canning jar. I saw someone who had their own booth sold little jars of their own homemade chalk paint. It would be a great gift to make for a friend.


Then I just use my Purdy brush and start painting. I thought this piece would look great with some teal-grey so I added that to the inside and places in the front. I got my handy husband to put a hole in the middle of the drawer for my knob.


I had to lock the cats in my daughters room as they wanted to help.:)


I guess let them out to soon because look what I found on the inside of the cabinet the next morning. (above) I'm sentimental---I think it just adds to the memories. :)


To do the distressing I have tried many things..sanding etc. My favorite thing is to use Rub N Buff. I just go over it with my finger and accent all the pretty details. I think it brings the piece alive. My favorite color of Rub N Buff is Spanish copper. You can buy this at some art stores, or Ebay.


My finger is my favorite tool for this technique!


I often paint my hardware on a project.You can paint in place if you want but I always remove it and paint it and distress it before putting it back on.


After everything is totally dry I wax it to seal it with a paste wax. There are many available. You just rub it on with a lint free cloth.

 I really love the new look of my new TV cabinet!


So that is how I transform old Goodwill furniture into shabby chic furniture that I love. Feel free to ask if you have any questions and I hope that this post will inspire some of you to have fun remaking furniture. 

I will end this post with a few of my other favorite remade pieces.


Thanks so much for visiting!